> ## Documentation Index
> Fetch the complete documentation index at: https://docs.stigg.io/llms.txt
> Use this file to discover all available pages before exploring further.
# Custom flows
## Creating your own flow
The Stigg flow actions can be used in any Salesforce Flow — you are not limited to triggering from an Opportunity. You can start your flow from any standard or custom Salesforce object (Accounts, Contacts, Cases, custom objects, etc.) and include the Stigg actions wherever provisioning or credit granting is needed.
Leverage the default template flow to create a version tailored to your business needs.
* Open the **Opportunity - Stigg Subscription Template** flow to begin customizing it.
Before provisioning resources in Stigg (between **Step 2** and **Step 3** of the [default template](#default-template)), insert a new [HTTP callout action](https://help.salesforce.com/s/articleView?id=sf.flow_http_callout_configure.htm).
* Use this action to send an API request to your application to provision entities such as **accounts**, **organizations**, or **workspaces**.
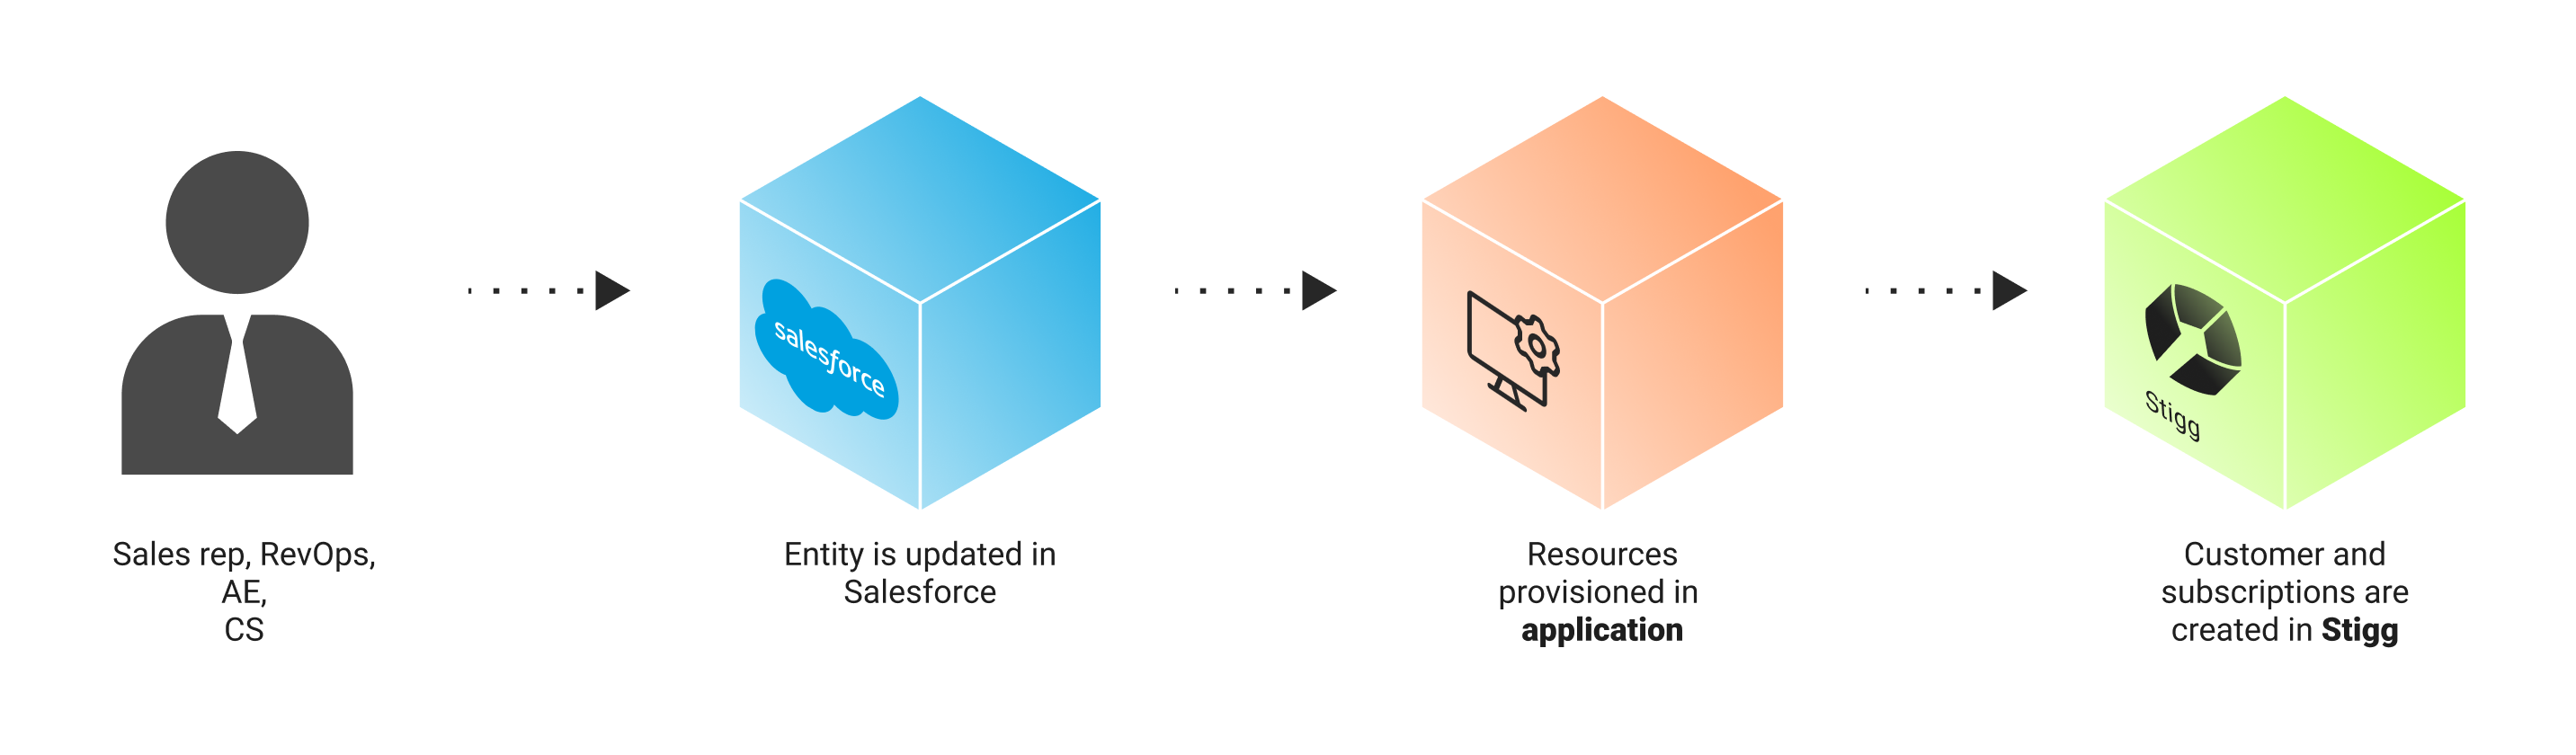 Update the **Create Stigg Customer** and **Create Stigg Subscription** steps in the flow:
* Use the resource IDs returned by your application’s API
* These IDs should be passed to Stigg when creating the corresponding customer and subscription
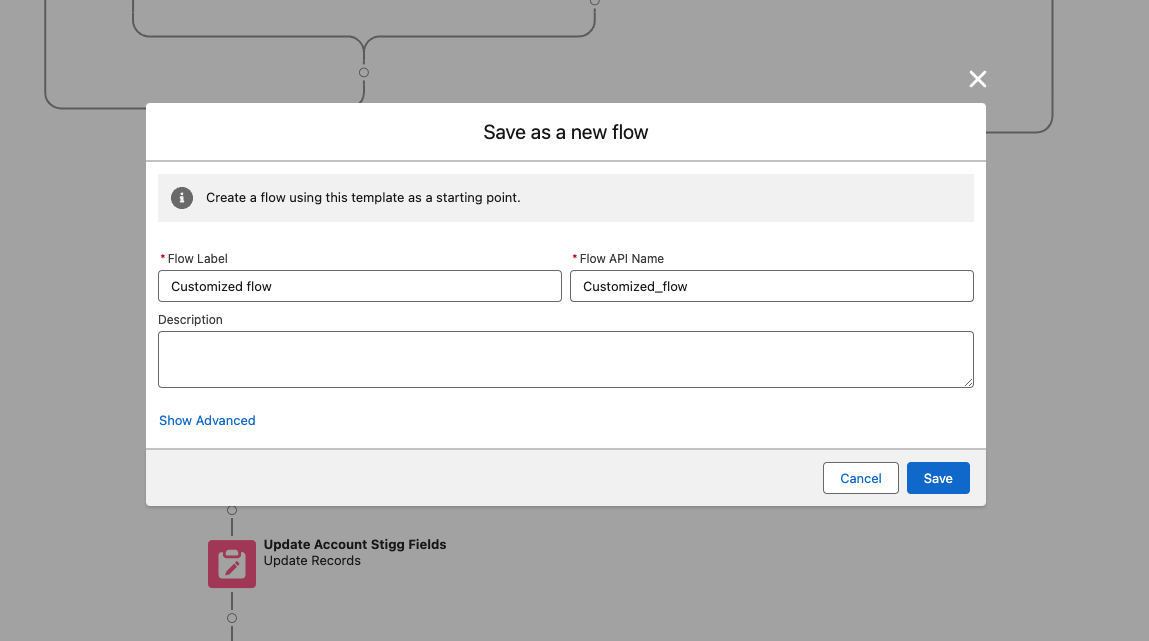
Once you've applied all changes, click **Save As** to create a new version of the flow.
Update the **Create Stigg Customer** and **Create Stigg Subscription** steps in the flow:
* Use the resource IDs returned by your application’s API
* These IDs should be passed to Stigg when creating the corresponding customer and subscription
Once you've applied all changes, click **Save As** to create a new version of the flow.
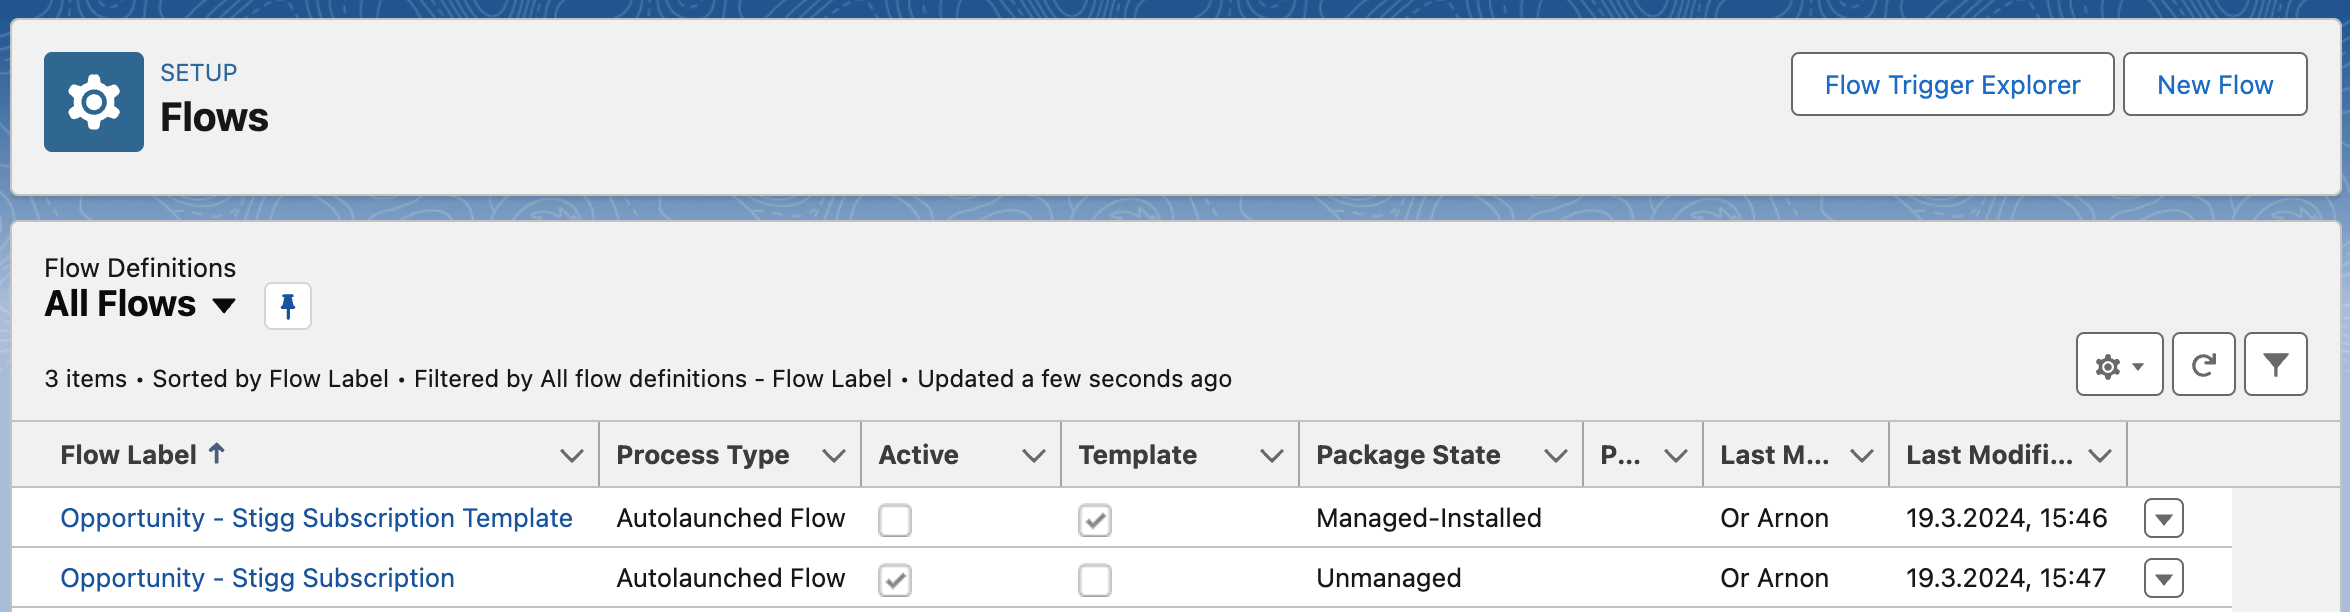
 * Make sure the **default template flow is deactivated**
* Activate your newly saved, customized flow to ensure it is used going forward
* Make sure the **default template flow is deactivated**
* Activate your newly saved, customized flow to ensure it is used going forward
 ### Provisioning custom subscriptions with entitlements
In this configuration, Stigg is responsible only for provisioning and fulfillment of entitlements - billing is handled separately through your existing Salesforce processes. To set it up:
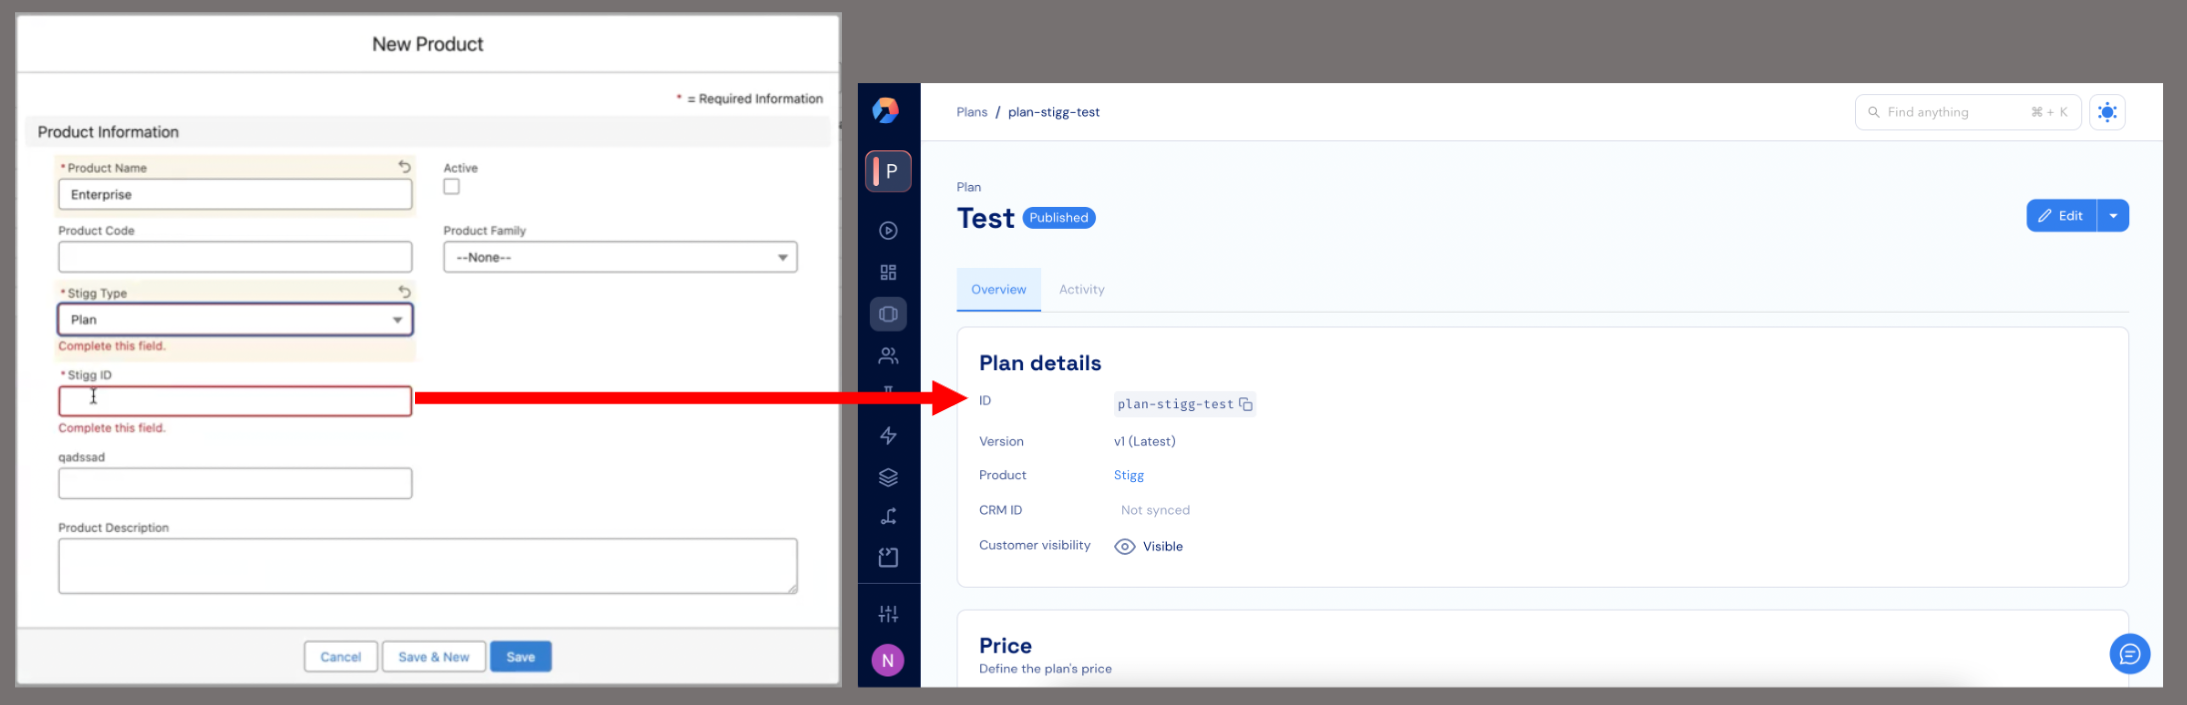
Create a product in Salesforce to represent your Stigg plan.
* Set the **Stigg Type** to `Plan`
* Set the **Stigg ID** to the corresponding plan ID in your Stigg app
Then, create additional products for each entitlement included in the plan.
* For each entitlement product, set the **Stigg Type** to `Entitlement`
* Set the **Stigg ID** to the corresponding entitlement ID in Stigg
### Provisioning custom subscriptions with entitlements
In this configuration, Stigg is responsible only for provisioning and fulfillment of entitlements - billing is handled separately through your existing Salesforce processes. To set it up:
Create a product in Salesforce to represent your Stigg plan.
* Set the **Stigg Type** to `Plan`
* Set the **Stigg ID** to the corresponding plan ID in your Stigg app
Then, create additional products for each entitlement included in the plan.
* For each entitlement product, set the **Stigg Type** to `Entitlement`
* Set the **Stigg ID** to the corresponding entitlement ID in Stigg
 In Salesforce, create a new **Account** and an associated **Opportunity** for that account.
* Open the opportunity
* Navigate to **Products → Add Products**
* Add both the plan product and the entitlement products
**Salesforce product checklist - product not appearing in **Add Products** search?**
For a product to appear when searching on an Opportunity, all three of the following must be true:
1. **The Product must be Active** - open the product record and confirm the **Active** checkbox is checked.
2. **The Product must have an Active Standard Price** - go to the product's **Related** tab and confirm a standard price exists in the **Price Books** related list. If it's missing, click **Add Standard Price** to add one.
3. **The Opportunity must use the same Price Book** - the Opportunity's Price Book must match the Price Book the product is assigned to. Open the Opportunity, check the **Price Book** field, and ensure it matches.
During the product selection flow:
* Assign quantities for each product according to your desired subscription configuration
* Move the opportunity to **Closed/Won** to trigger the provisioning process
Once the opportunity is closed:
* A corresponding **customer** will be created in Stigg
* Their **subscription**, including associated entitlements, will appear in the [**Customers** section](../../../managing-customers-and-subscriptions/customers/viewing-customers) of your Stigg app
### Provisioning paid subscriptions, price overrides, and invoices
Stigg’s Salesforce integration supports provisioning of paid subscriptions with price overrides and invoice-based billing, enabling SaaS companies to implement complete Order-to-Cash (O2C) flows directly from Salesforce. This allows Salesforce to act as the quoting and opportunity management layer, while Stigg handles subscription fulfillment and billing orchestration, including automated invoice generation.

To enable invoice-based billing, configure the **Create Stigg Subscription** node in your Salesforce Flow:
* Set the **Payment Collection Method** to `INVOICE`: this instructs Stigg to generate an invoice instead of attempting automatic payment.
In Stigg:
* Ensure the **customer** receiving the subscription has a valid billing email address associated with their profile.
* This email will be used for invoice delivery.
* The same email address should also exist in the **Contacts** section of the corresponding Salesforce account.
The mapping between Salesforce products and Stigg entities (via **Stigg Type** and **Stigg ID**) should be configured once during the initial integration setup.
A billing email address is required for invoice generation. Make sure to include this email when creating or updating the customer in Stigg. Without it, invoices cannot be sent or fulfilled.
For more details on using invoice-based billing in Stigg, see the [Billing with Invoices guide](../../../../guides/i-want-to/bill-customers-using-invoices)
Save the modified flow as a new version and activate it.
* Create a new **Opportunity** in Salesforce
* Add the Salesforce product that refers to the paid plan in Stigg
* Add any entitlement products included in the plan
* Assign appropriate quantities based on the desired configuration
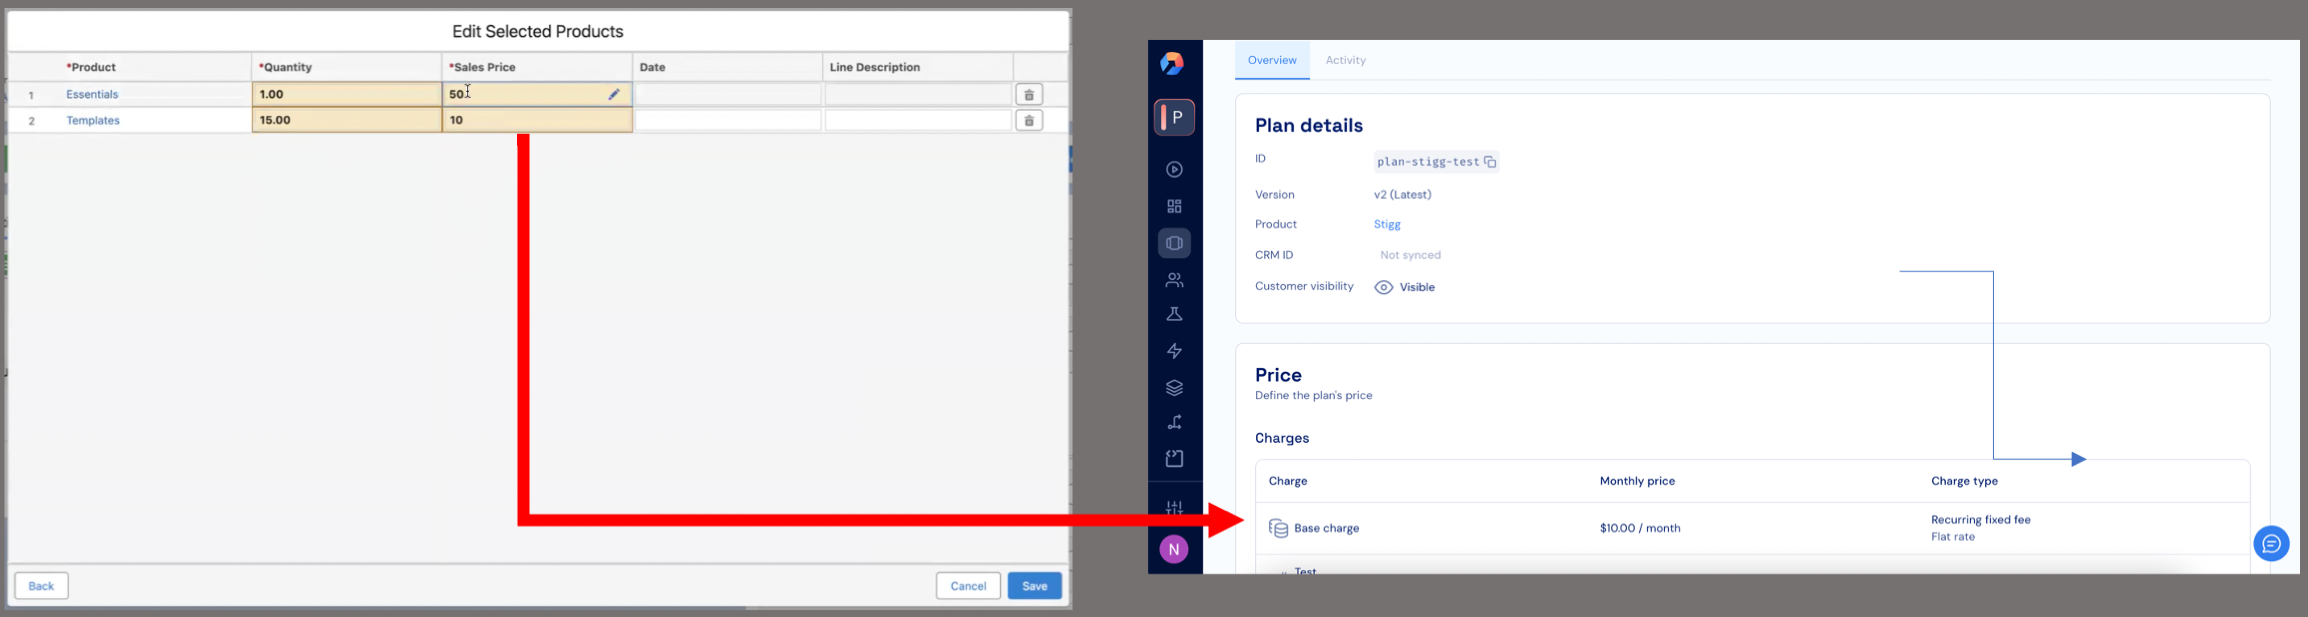
In the **Sales Price** column for each product in the opportunity, enter the price that should be used for billing. These values will override the default prices in Stigg and will be used as the base charges when the subscription is provisioned. For usage-based charges this will be used as a flat-fee.
In Salesforce, create a new **Account** and an associated **Opportunity** for that account.
* Open the opportunity
* Navigate to **Products → Add Products**
* Add both the plan product and the entitlement products
**Salesforce product checklist - product not appearing in **Add Products** search?**
For a product to appear when searching on an Opportunity, all three of the following must be true:
1. **The Product must be Active** - open the product record and confirm the **Active** checkbox is checked.
2. **The Product must have an Active Standard Price** - go to the product's **Related** tab and confirm a standard price exists in the **Price Books** related list. If it's missing, click **Add Standard Price** to add one.
3. **The Opportunity must use the same Price Book** - the Opportunity's Price Book must match the Price Book the product is assigned to. Open the Opportunity, check the **Price Book** field, and ensure it matches.
During the product selection flow:
* Assign quantities for each product according to your desired subscription configuration
* Move the opportunity to **Closed/Won** to trigger the provisioning process
Once the opportunity is closed:
* A corresponding **customer** will be created in Stigg
* Their **subscription**, including associated entitlements, will appear in the [**Customers** section](../../../managing-customers-and-subscriptions/customers/viewing-customers) of your Stigg app
### Provisioning paid subscriptions, price overrides, and invoices
Stigg’s Salesforce integration supports provisioning of paid subscriptions with price overrides and invoice-based billing, enabling SaaS companies to implement complete Order-to-Cash (O2C) flows directly from Salesforce. This allows Salesforce to act as the quoting and opportunity management layer, while Stigg handles subscription fulfillment and billing orchestration, including automated invoice generation.

To enable invoice-based billing, configure the **Create Stigg Subscription** node in your Salesforce Flow:
* Set the **Payment Collection Method** to `INVOICE`: this instructs Stigg to generate an invoice instead of attempting automatic payment.
In Stigg:
* Ensure the **customer** receiving the subscription has a valid billing email address associated with their profile.
* This email will be used for invoice delivery.
* The same email address should also exist in the **Contacts** section of the corresponding Salesforce account.
The mapping between Salesforce products and Stigg entities (via **Stigg Type** and **Stigg ID**) should be configured once during the initial integration setup.
A billing email address is required for invoice generation. Make sure to include this email when creating or updating the customer in Stigg. Without it, invoices cannot be sent or fulfilled.
For more details on using invoice-based billing in Stigg, see the [Billing with Invoices guide](../../../../guides/i-want-to/bill-customers-using-invoices)
Save the modified flow as a new version and activate it.
* Create a new **Opportunity** in Salesforce
* Add the Salesforce product that refers to the paid plan in Stigg
* Add any entitlement products included in the plan
* Assign appropriate quantities based on the desired configuration
In the **Sales Price** column for each product in the opportunity, enter the price that should be used for billing. These values will override the default prices in Stigg and will be used as the base charges when the subscription is provisioned. For usage-based charges this will be used as a flat-fee.
 Move the opportunity to **Closed/Won**.
* This triggers the provisioning flow
* A new customer and subscription are created in Stigg
* An invoice is generated through your connected billing provider
* Once the invoice is paid, the subscription is activated in Stigg
### Provisioning paid subscriptions with credit charges
When a paid plan includes credit entitlements (e.g., a monthly allocation of API credits billed at a set price), you can pass those alongside feature entitlements in the **Create Stigg Subscription** node.
Create a product in Salesforce for each credit entitlement included in the plan.
* Set the **Stigg Type** to `Entitlement`
* Set the **Stigg ID** to the corresponding custom currency ID in Stigg (e.g., `currency-api-credits`)
In your **Salesforce Flow**, open the **Create Stigg Subscription** node:
* Set **Payment Collection Method** to the desired billing method (`PAYMENT_METHOD_ON_FILE` or `INVOICE`)
* In the **Subscription Credit Entitlements** field, provide a collection with one entry per credit entitlement:
* `customCurrencyId` - the ID of the custom currency in Stigg
* `amount` - the number of credits included
* `cadence` - `MONTH` or `YEAR`
* `price` - *(optional)* price override for this credit entitlement on the invoice
In Salesforce, create or open an **Opportunity**:
* Add the plan product and any feature entitlement products
* Add the credit entitlement products
* Assign quantities and sales prices as needed
Move the opportunity to **Closed/Won**.
* The subscription is created in Stigg with both feature and credit entitlements
* An invoice is generated if `INVOICE` was selected as the payment collection method
### Provisioning custom plans with credit entitlements
For custom plans where billing is handled outside of Stigg (no `paymentCollectionMethod`), you can provision mixed feature and credit entitlements together.
Create Salesforce products for each entitlement type:
* For **feature entitlements**: set **Stigg Type** to `Entitlement` and **Stigg ID** to the feature ID (e.g., `feature-seats`)
* For **credit entitlements**: set **Stigg Type** to `Entitlement` and **Stigg ID** to the custom currency ID (e.g., `currency-api-credits`)
Also create a product for the plan itself with **Stigg Type** set to `Plan`.
In your **Salesforce Flow**, open the **Create Stigg Subscription** node:
* Leave **Payment Collection Method** unset (this is a custom plan - billing is external)
* In the **Subscription Credit Entitlements** field, provide credit entitlement entries with:
* `customCurrencyId`, `amount`, and `cadence` (`MONTH` or `YEAR`)
* Feature entitlements continue to be passed as usual via mapped entitlement products
In Salesforce, create or open an **Opportunity**:
* Add the plan product
* Add feature entitlement products with their usage limits as quantities
* Add credit entitlement products with their credit amounts as quantities
Move the opportunity to **Closed/Won**.
* A customer and subscription are created in Stigg
* The subscription includes both feature and credit entitlements
### Granting credits (credit top-up)
Use the **Create Stigg Credit Grant** flow action to grant credits to a customer outside of a subscription. This is useful for one-off top-ups, promotional grants, or paid credit purchases.
In your Salesforce Flow, add an **Action** element and search for **Create Stigg Credit Grant**.
Configure the required fields:
* **Stigg Customer ID** - the ID of the customer receiving the credits
* **Grant Type** - `PROMOTIONAL` for free credits, or `PAID` for credits tied to a charge
* **Currency ID** - the ID of the custom currency in Stigg to grant (e.g. `cred-type-test`)
* **Display Name** - a label for the credit grant
* **Amount** - the number of credits to grant
Depending on your use case, you may also set:
| Field | Description |
| ----------------------------- | ------------------------------------------------------------- |
| **Resource ID** | Associates the grant with a specific external resource |
| **Comment** | Free-text note describing the reason for the grant |
| **Effective Date** | When the credits become available |
| **Expiration Date** | When unused credits expire |
| **Priority** | Order of consumption when multiple grants exist |
| **Payment Collection Method** | `PAYMENT_METHOD_ON_FILE` or `INVOICE` (for `PAID` grant type) |
| **Currency** | Cost currency for the credit grant (for `PAID` grant type) |
Save the flow as a new version and activate it.
* When the flow runs, the credit grant is created in Stigg for the specified customer
### Provisioning trial subscriptions
In your **Salesforce Flow**, open the **Create Stigg Subscription** node.
* Toggle **Trial** to on
* Set the **Trial** field to `True`
* Enable the **Trial End Date** toggle and set your desired trial end date
Save the flow as a new version and activate it.
In Salesforce, create or open an **Opportunity**.
* Add the relevant **plan and entitlement products** from your **Salesforce price book**
* These products should already be mapped to Stigg entities as part of the integration setup
* Set the appropriate **quantity** and **price** for each product to match your desired trial configuration
Move the opportunity to **Closed/Won**.
* This triggers the flow and provisions the trial subscription in Stigg
* A corresponding **customer** will appear in the **Customers** section of your Stigg app
Move the opportunity to **Closed/Won**.
* This triggers the provisioning flow
* A new customer and subscription are created in Stigg
* An invoice is generated through your connected billing provider
* Once the invoice is paid, the subscription is activated in Stigg
### Provisioning paid subscriptions with credit charges
When a paid plan includes credit entitlements (e.g., a monthly allocation of API credits billed at a set price), you can pass those alongside feature entitlements in the **Create Stigg Subscription** node.
Create a product in Salesforce for each credit entitlement included in the plan.
* Set the **Stigg Type** to `Entitlement`
* Set the **Stigg ID** to the corresponding custom currency ID in Stigg (e.g., `currency-api-credits`)
In your **Salesforce Flow**, open the **Create Stigg Subscription** node:
* Set **Payment Collection Method** to the desired billing method (`PAYMENT_METHOD_ON_FILE` or `INVOICE`)
* In the **Subscription Credit Entitlements** field, provide a collection with one entry per credit entitlement:
* `customCurrencyId` - the ID of the custom currency in Stigg
* `amount` - the number of credits included
* `cadence` - `MONTH` or `YEAR`
* `price` - *(optional)* price override for this credit entitlement on the invoice
In Salesforce, create or open an **Opportunity**:
* Add the plan product and any feature entitlement products
* Add the credit entitlement products
* Assign quantities and sales prices as needed
Move the opportunity to **Closed/Won**.
* The subscription is created in Stigg with both feature and credit entitlements
* An invoice is generated if `INVOICE` was selected as the payment collection method
### Provisioning custom plans with credit entitlements
For custom plans where billing is handled outside of Stigg (no `paymentCollectionMethod`), you can provision mixed feature and credit entitlements together.
Create Salesforce products for each entitlement type:
* For **feature entitlements**: set **Stigg Type** to `Entitlement` and **Stigg ID** to the feature ID (e.g., `feature-seats`)
* For **credit entitlements**: set **Stigg Type** to `Entitlement` and **Stigg ID** to the custom currency ID (e.g., `currency-api-credits`)
Also create a product for the plan itself with **Stigg Type** set to `Plan`.
In your **Salesforce Flow**, open the **Create Stigg Subscription** node:
* Leave **Payment Collection Method** unset (this is a custom plan - billing is external)
* In the **Subscription Credit Entitlements** field, provide credit entitlement entries with:
* `customCurrencyId`, `amount`, and `cadence` (`MONTH` or `YEAR`)
* Feature entitlements continue to be passed as usual via mapped entitlement products
In Salesforce, create or open an **Opportunity**:
* Add the plan product
* Add feature entitlement products with their usage limits as quantities
* Add credit entitlement products with their credit amounts as quantities
Move the opportunity to **Closed/Won**.
* A customer and subscription are created in Stigg
* The subscription includes both feature and credit entitlements
### Granting credits (credit top-up)
Use the **Create Stigg Credit Grant** flow action to grant credits to a customer outside of a subscription. This is useful for one-off top-ups, promotional grants, or paid credit purchases.
In your Salesforce Flow, add an **Action** element and search for **Create Stigg Credit Grant**.
Configure the required fields:
* **Stigg Customer ID** - the ID of the customer receiving the credits
* **Grant Type** - `PROMOTIONAL` for free credits, or `PAID` for credits tied to a charge
* **Currency ID** - the ID of the custom currency in Stigg to grant (e.g. `cred-type-test`)
* **Display Name** - a label for the credit grant
* **Amount** - the number of credits to grant
Depending on your use case, you may also set:
| Field | Description |
| ----------------------------- | ------------------------------------------------------------- |
| **Resource ID** | Associates the grant with a specific external resource |
| **Comment** | Free-text note describing the reason for the grant |
| **Effective Date** | When the credits become available |
| **Expiration Date** | When unused credits expire |
| **Priority** | Order of consumption when multiple grants exist |
| **Payment Collection Method** | `PAYMENT_METHOD_ON_FILE` or `INVOICE` (for `PAID` grant type) |
| **Currency** | Cost currency for the credit grant (for `PAID` grant type) |
Save the flow as a new version and activate it.
* When the flow runs, the credit grant is created in Stigg for the specified customer
### Provisioning trial subscriptions
In your **Salesforce Flow**, open the **Create Stigg Subscription** node.
* Toggle **Trial** to on
* Set the **Trial** field to `True`
* Enable the **Trial End Date** toggle and set your desired trial end date
Save the flow as a new version and activate it.
In Salesforce, create or open an **Opportunity**.
* Add the relevant **plan and entitlement products** from your **Salesforce price book**
* These products should already be mapped to Stigg entities as part of the integration setup
* Set the appropriate **quantity** and **price** for each product to match your desired trial configuration
Move the opportunity to **Closed/Won**.
* This triggers the flow and provisions the trial subscription in Stigg
* A corresponding **customer** will appear in the **Customers** section of your Stigg app